


It can be a little difficult to get post previews to show the images and title you want for your post when you share it on social media. Moreover, each social media platform has its own requirements for the way that you use meta tags to accomplish this. In this post, I’ll show you the approach that has worked best for me in getting the desired post preview displayed correctly on Twitter, LinkedIn, and Facebook.
What are Meta Tags?
Meta tags are HTML tags that you place in the header of any page on your website. They are used to provide additional information about the page to search engines and other websites, essentially containing the meta information for the page.
When it comes to social media websites, meta tags are employed to indicate the desired information for display when you share a post on their platform. These tags primarily specify the image, title, and description for the page you intend to share.
In the event that these tags are missing, some platforms will attempt to analyze the page’s content and generate their own values for display. However, based on my experience, it is much better to set up your meta tags so that these sites know precisely how you want this information displayed when posting a link to their platform.
My Setup
Now, let’s take a look at the setup I use to ensure that posts preview the way I want them to on the three major social platforms I use. Also, I have noticed some interesting nuances across these three platforms regarding their requirements for setting up meta tags for post previews. I’ll mention those as I explain how I set up meta tags for my projects.
Html <head>
The first thing that is important to understand when setting up your meta tags is that these tags reside in the <head> tag of your HTML. Here’s an example of boilerplate HTML, which includes the <head> tag. Other elements like the page title and favicon are also configured within the <head> tag, along with <script> tags for CSS and JavaScript.
<!DOCTYPE html>
<html lang="en">
<head>
    <meta charset="UTF-8">
    <meta name="viewport" content="width=device-width, initial-scale=1.0">
    <title>Document</title>
</head>
<body>

</body>
</html>
In the above example, the <head> tag contains two meta tags. The first one specifies the character encoding for the page, while the second one provides information to control the layout and scaling of a webpage on different devices. The crucial point to note is that this is also where the meta tags go, which specify how a post should be displayed on various social media platforms.
Social Media Meta Tags
Now, let’s take a look at the specific tags used to configure the title, image, and description that you want to be displayed when you post a link to a page on Twitter, LinkedIn, or Facebook.
Title Meta Tag
The following code represents the tags you need to include within the <head> tag of your HTML to ensure that the title displays as desired on these three platforms:
<head>
    <!-- title meta tags -->
    <title>Your Page Title</title>
    <meta name="title" property="og:title" content="Your Page Title" />
    <meta name="og:title" content="Your Page Title" />
    <meta name="twitter:title" content="Your Page Title" />
</head>
The reason for having multiple tags for the same purpose is due to the nuances mentioned earlier in the post. The meta tag with the specific name for Twitter is required by Twitter itself, and LinkedIn requires the property attribute on a meta tag. The others are used at least by Facebook and are likely used by the other social media websites outside of the three that we are considering in this post. It’s also important to note that these nuances apply to the rest of the meta tags discussed in this post.
Image Meta Tag
The following code demonstrates the addition of necessary meta tags to display the desired image when sharing a link on the three social media platforms:
<head>
    <!-- title meta tags -->
    <title>Your Page Title</title>
    <meta name="title" property="og:title" content="Your Page Title" />
    <meta name="og:title" content="Your Page Title" />
    <meta name="twitter:title" content="Your Page Title" />

    <!-- image meta tags -->
    <meta name="image" property="og:image" content="https://yourdomain/yourimage.jpg" />
    <meta name="og:image" content="https://yourdomain/yourimage.jpg" />
    <meta name="twitter:image" content="https://yourdomain/yourimage.jpg" />
</head>
Description Meta Tag
The following code demonstrates the addition of necessary meta tags to display the desired description when sharing a link on the three social media platforms. It’s worth noting that this tag only works for Twitter and Facebook; LinkedIn does not display the description for a shared page on their platform:
<head>
    <!-- title meta tags -->
    <title>Your Page Title</title>
    <meta name="title" property="og:title" content="Your Page Title" />
    <meta name="og:title" content="Your Page Title" />
    <meta name="twitter:title" content="Your Page Title" />

    <!-- image meta tags -->
    <meta name="image" property="og:image" content="https://yourdomain/yourimage.jpg" />
    <meta name="og:image" content="https://yourdomain/yourimage.jpg" />
    <meta name="twitter:image" content="https://yourdomain/yourimage.jpg" />

    <!-- description meta tags -->
    <meta name="description" property="og:description" content="Your Page Description"/>
    <meta name="og:description" content="Your Page Description" />
    <meta name="twitter:description" content="Your Page Description" />
</head>
Testing A Page
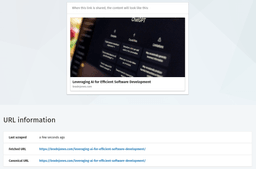
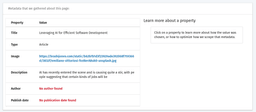
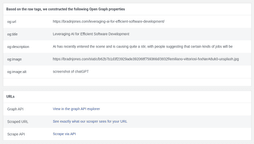
Something that helps a lot with this is the Preview tools that each platform (except twitter) has made available to ensure that your web page is correctly interpreted by each platform. Here’s an example of what each of these tools looks like for the last blog post I created “Leveraging AI for Efficient Software Development”
You can use the tweet composer to see what the link will look like as you write your tweet. Here’s a screenshot to demonstrate this:


Conclusion
There are a lot of other meta tags that you can add for social media but these are the basic ones that need to be in place in order to preview a web page in your post. One thing is clear, there has been standardization around this which is why there are so many variations of how each meta tag is used depending on the platform’s requirements.